presented by Joe Ganci, of Dazzle Technologies Corp.
New things that are different from yesterday's Master Class -
When recording, you can hit the pause button to pause the recording action, so you can move things around or adjust things in the middle.
During his example, the screen blacked out on his laptop - JG says this is when it goes into FRM mode which changes the acceleration of the video card automatically so that the capture can be played back appropriately. The black will not show during playback. This does not happen on my system, but I'm using a ATI Radeon X1200 video card.
If you have to deliver in more than two languages, there is a productive way to accomplish this by creating the file, then save the file several times with different names. Export the captions in the first file you want to change, change the text, save the export and change the Updated Caption Text Data to the different language, then reimport the captions.
If you do create new rdl files for alternate languages, I haven't tried this but I wonder if you downloaded additional clx files into the Spelling/Languages directory in captivate, would it work to spell check any additional text you have added to the project out side the captions? Dictionary files are available all over the web.
Note: Closed captioning defaults are changed only in the skin area, not in the overall preferences.
During the break - woot, I won a T-shirt!
I really need to take the time to rip apart the behind the scenes stuff that is going on with this program. It seems that there are many things that can be tweaked that most people haven't even tried yet.
Since all events made by software when you are building simulation are the only thing capture when recording with Captivate (very annoying),- I've done this in the past, but if I do not hear the shutter (happens alot when simulating with firefox) you can press the PrtScr button on the keyboard. Note: you may have to adjust the timing on these slides a little.
It is possible to track teh user's progress on any type of interactions built into Captivate (test entry, click box, or button) - this is on the Reporting tab. Normally the include in Quiz otpin is turned off - by turning it on, you allow captivate to include this interaction in the final process bar.
Ok, time to go home - I will try to post my summary thoughts tomorrow, as it seems that it might take longer to get home due to delays at the airports. :(
Showing posts with label Ganci. Show all posts
Showing posts with label Ganci. Show all posts
Thursday, April 17, 2008
Wednesday, April 16, 2008
Captivate Tips and Tricks for v3.0 - J. Ganci
This has to be the fastest demonstration I've been to in awhile. Below is the cliff notes, I will post screen shots and possibly demonstrations later. I need a break!
Note: all these tips plus additional information will be found at J. Ganci's website in about two days
Roll over slidelets - these are found under the Insert menu - a rollover slidelet is a space on a slide that displays an associated slidelet (a slide within a slide) when the mouse is moved over the space. You can insert and display objects in the slidelet using the same procedure as that for the slides. Very cool - just a note, you can remove blue frame that is shown as a default by accessing the properties of the rollover area and unchecking the border on the main tab.
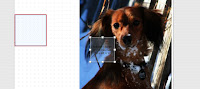
In the image below, what I did is add a slidelet over my dog Sophie's nose (the brown dog) so when you mouse over it, my other dog's tongue appears (the black dog). The image (or other object except for mouse movements and interactions) will appear for however long you have programmed it to appear in it's own timeline. Click on the image to see it in it's original size.....
Redraw shape was explained at this time to customize the roll over area. If you right mouse on the roll over area in the slide, the Redraw Shape option appears:
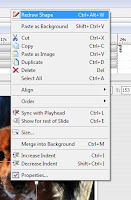
This allows you to customize the shape (rather than having the default square/rectangle) that the rollover box takes on the screen. This way you can be more precise with roll over areas - when I tested it, I outlined Sophies nose exactly, so if you click anywhere except directly on the black part of her nose, the slidelet will not play. Very cool if you need to have more precise interactivity.
You can resize images in slidelets as you import them just as you would with the main slides - however videos are different - but the x/y ratios must match....
Another note: small areas that are created when you start using rollovers can be difficult to find and modify - these can be tabbed to (just like fields in software) and if you hit enter, it will bring up the properties and you can make changes from there.
Here is a new one for me. You can update captions and put in multiple tables that appear as defaults. This is accomplished by exporting the caption:
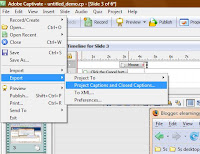
It is exported as a word file, which you can modify:

Just change the updated text section and save the file.
You can also create your own language files if there is a language you need to do Auto Captions for, but it was not included in the default languages. In the Captivate directory there are files(.rdl extensions):

That you can open with notepad, modify, and save as the same format and they will appear in the language drop down of the recording window.
Naming slides helps when creating jumps - names will show up in jump drop down menu. Some other great ideas for notes slides include revision history or put instructions in for visually impaired individuals in the accessibility option.
He is going to present more tomorrow - topics include timing, narration, publishings, and other tips and tricks.
Note: all these tips plus additional information will be found at J. Ganci's website in about two days
Roll over slidelets - these are found under the Insert menu - a rollover slidelet is a space on a slide that displays an associated slidelet (a slide within a slide) when the mouse is moved over the space. You can insert and display objects in the slidelet using the same procedure as that for the slides. Very cool - just a note, you can remove blue frame that is shown as a default by accessing the properties of the rollover area and unchecking the border on the main tab.
In the image below, what I did is add a slidelet over my dog Sophie's nose (the brown dog) so when you mouse over it, my other dog's tongue appears (the black dog). The image (or other object except for mouse movements and interactions) will appear for however long you have programmed it to appear in it's own timeline. Click on the image to see it in it's original size.....

Redraw shape was explained at this time to customize the roll over area. If you right mouse on the roll over area in the slide, the Redraw Shape option appears:

This allows you to customize the shape (rather than having the default square/rectangle) that the rollover box takes on the screen. This way you can be more precise with roll over areas - when I tested it, I outlined Sophies nose exactly, so if you click anywhere except directly on the black part of her nose, the slidelet will not play. Very cool if you need to have more precise interactivity.
You can resize images in slidelets as you import them just as you would with the main slides - however videos are different - but the x/y ratios must match....
Another note: small areas that are created when you start using rollovers can be difficult to find and modify - these can be tabbed to (just like fields in software) and if you hit enter, it will bring up the properties and you can make changes from there.
Here is a new one for me. You can update captions and put in multiple tables that appear as defaults. This is accomplished by exporting the caption:

It is exported as a word file, which you can modify:

Just change the updated text section and save the file.
You can also create your own language files if there is a language you need to do Auto Captions for, but it was not included in the default languages. In the Captivate directory there are files(.rdl extensions):

That you can open with notepad, modify, and save as the same format and they will appear in the language drop down of the recording window.
Naming slides helps when creating jumps - names will show up in jump drop down menu. Some other great ideas for notes slides include revision history or put instructions in for visually impaired individuals in the accessibility option.
He is going to present more tomorrow - topics include timing, narration, publishings, and other tips and tricks.
Subscribe to:
Posts (Atom)